Secure Your Developer VPS in Minutes for Container Ready Deploys
Secure Your Developer VPS in Minutes for Container Ready Deploys
Lock the VPS down before you touch application code: update packages, create a non-root sudo user with SSH key authentication, and enable UFW. From there, install Docker and your language runtimes, add a reverse proxy with TLS, and wire up CI so pushes deploy automatically. Do it in that order and you end up with a hardened, reproducible server your whole team can use for coding, testing, and shipping.
TL;DR:
- Hardening the VPS before installing applications minimizes the risk of compromise by closing ports, disabling root login, and enforcing SSH key authentication.
- Installing Docker, Node LTS via NVM, Python, and PHP, along with organizing projects under non-root directories, ensures consistent environments for development and deployment.
- Using a reverse proxy with TLS and Certbot simplifies hosting multiple projects on one server and secures traffic without complex port management.
- Automating setup and deployment with scripts, Ansible, or Terraform reduces errors and allows quick, repeatable provisioning across multiple servers.
- Combining monitoring tools like Uptime Kuma, Netdata, and log services like Grafana with Loki provides reliable oversight without extensive configuration.
Table of Contents
- First Login and Security Hardening for Your Developer VPS Setup
- Which Runtimes and Tools Belong on a Coding Server?
- Routing Traffic and Shipping Your First App
- Building a Deploy Pipeline That Doesn’t Break Production
- Should You Manage Your VPS With a Dashboard Instead of SSH?
- What Should You Monitor and Back Up First?
- Setting Up Database Services and Connection Security
- Automating Environment Setup With Scripts and Infrastructure as Code
- Logging and Log Management Setup
- User and Permission Management for Multi-Developer Collaboration
- Network Configuration and Port Management Beyond Firewall Basics
- When Does a VPS Actually Make Sense for Developers?
- AceRDP Gets You Past Setup and Into Building
- Sources
- FAQ
First Login and Security Hardening for Your Developer VPS Setup
The moment a fresh VPS gets a public IP, bots start scanning it. Deployments left exposed before hardening can be compromised within minutes, which is why the first login sequence matters more than any framework choice you’ll make later.
Here’s the order that keeps you safe without locking yourself out:
- Check what you’re working with:
lsb_release -a,uname -r,df -h, andss -tulpntell you the distro, kernel, disk space, and open ports. - Run
apt update && apt upgrade -y, then enable unattended security updates withapt install unattended-upgrades. - Create a sudo user:
adduser yournamefollowed byusermod -aG sudo yourname. - Copy your public key into
~/.ssh/authorized_keysfor that user, then log in from a second terminal window to confirm key auth works before touching anything else. - Edit
/etc/ssh/sshd_configto setPermitRootLogin noandPasswordAuthentication no, then restart SSH. - Configure the firewall:
ufw allow OpenSSH,ufw allow 80,ufw allow 443, thenufw enable. - Install Fail2Ban to throttle brute-force attempts against SSH.
Verify everything before you walk away: open a fresh terminal, SSH in with your key, confirm root login fails, and run sudo ufw status to check the rules stuck.
Pro Tip: Never close your original root session until the new sudo user and key auth are confirmed working in a separate window. That second session is your safety net if something in the SSH config is wrong.
Which Runtimes and Tools Belong on a Coding Server?
Ubuntu LTS is the default recommendation for a reason: it has the widest package support and documentation base of any distro developers run into, which matters when you’re troubleshooting at 11 p.m. Debian is the leaner alternative if you want a more minimal, production-stable base, but most guides steer new developer VPS builds toward Ubuntu 24.04 or 26.04 LTS with a minimal recommended disk size.
Once the OS is settled, install the tooling that makes the server behave like your laptop:
- Docker and Compose:
curl -fsSL https://get.docker.com | sh, then add your user to the docker group so you’re not typingsudoconstantly. Container-first workflows mean the app that runs on your VPS is identical to what runs in CI and in production. - nvm and Node LTS: install nvm, then
nvm install --lts. This matters beyond convenience. Webpack Dev Server 5 and later requires Node 18.12.0 or newer and webpack 5, and version managers make it painless to jump between projects pinned to different Node releases, a pattern Express’s own setup guides recommend for exactly this reason. - Python and PHP: use
pyenvorapt-installedpython3-venvfor isolated environments, andapt install php-fpmif you’re running a PHP stack behind nginx. - Directory layout: keep projects under
/srv/apps/or/home/yourname/apps/, owned by your sudo user, never root, so deploy scripts and CI runners don’t need elevated permissions to touch your code.
Routing Traffic and Shipping Your First App
A reverse proxy is what lets one VPS host several projects on one IP address, each answering to its own subdomain, without you juggling ports in your head. Nginx sits in front of your containers and forwards traffic based on the hostname, while Certbot handles the certificate work.
- Install nginx, then write a server block that proxies
yourapp.devtolocalhost:3000(or whatever port your container exposes). - Run
certbot --nginx -d yourapp.devto get a free TLS certificate; Certbot sets up auto-renewal so you never think about expiry again. - Write a small
docker-compose.ymlfor a Node app: one service for the app, one for a database if needed, both on a shared network. - Test locally with
curl -H "Host: yourapp.dev" http://localhostbefore your DNS even points at the server, so you catch config errors early. - If you don’t have a domain ready, a tunnel tool works for quick demos, but switch to a real domain and Certbot the moment more than one person needs to see the app.
Building a Deploy Pipeline That Doesn’t Break Production
A raw git post-receive hook that pulls and restarts containers works fine solo, but it has no safety net. The moment a second developer touches the repo, you want tests gating every deploy.
- Simple hook: a
post-receivescript that runsgit pullanddocker compose up -d --buildon push. Fast, but nothing stops a broken commit from going live. - GitHub Actions: a workflow that runs your test suite, builds the image, and only then calls a deploy webhook on the VPS (a small script listening on an internal port, never exposed publicly).
- Secrets: store API keys and database credentials in GitHub Actions secrets, never in the repo, and inject them as environment variables at deploy time.
- Rollback: tag each deployed image with the commit SHA so reverting is just redeploying the previous tag.
Pro Tip: Deploy to a staging subdomain first and smoke-test it before flipping DNS or your load balancer to point production traffic at the new build.
Should You Manage Your VPS With a Dashboard Instead of SSH?
Not every teammate wants to live in a terminal, and that’s fine. Cockpit gives you a browser-based control room for your server: CPU and memory graphs, service management, and log viewing, installed with a couple of commands and enabled on port 9090.
Coolify goes further. It automates deployments, database provisioning, and TLS certificates, closer to a self-hosted Heroku than a monitoring dashboard. A modern developer VPS workflow increasingly leans on exactly this pairing: Cockpit for visibility, Coolify for push-button deploys.
- Use Cockpit when you want quick visual insight without replacing your existing deploy scripts.
- Use Coolify when you want a Heroku-like experience layered on top of your own hardware.
- Never expose either dashboard directly to the internet; put it behind the same nginx reverse proxy and firewall rules protecting everything else, and restrict access with authentication or a VPN.
- Both tools sit comfortably on top of the Docker and reverse-proxy architecture you already built, they don’t replace it.
What Should You Monitor and Back Up First?
Skip building a monitoring stack from scratch. Uptime Kuma checks whether your services are actually reachable, Netdata gives you live system metrics, and the combination of Netdata, Uptime Kuma, and Grafana with Loki covers uptime, resource use, and logs without much setup work.
- Back up your database and any persistent Docker volumes on a schedule, daily for active projects, weekly at minimum for anything else.
- Store backups off the VPS itself. A drive failure that takes down your server shouldn’t also take down your backups.
- Auto-update your OS security patches, but test updates to Docker, your database engine, or nginx before applying them to a running service.
- Run a monthly pass: check disk usage, rotate logs, confirm certificate expiry dates, and review pending package updates.
A quick sanity check: if you can’t remember the last time you looked at your server’s disk usage, that’s the first thing to check today.
Setting Up Database Services and Connection Security
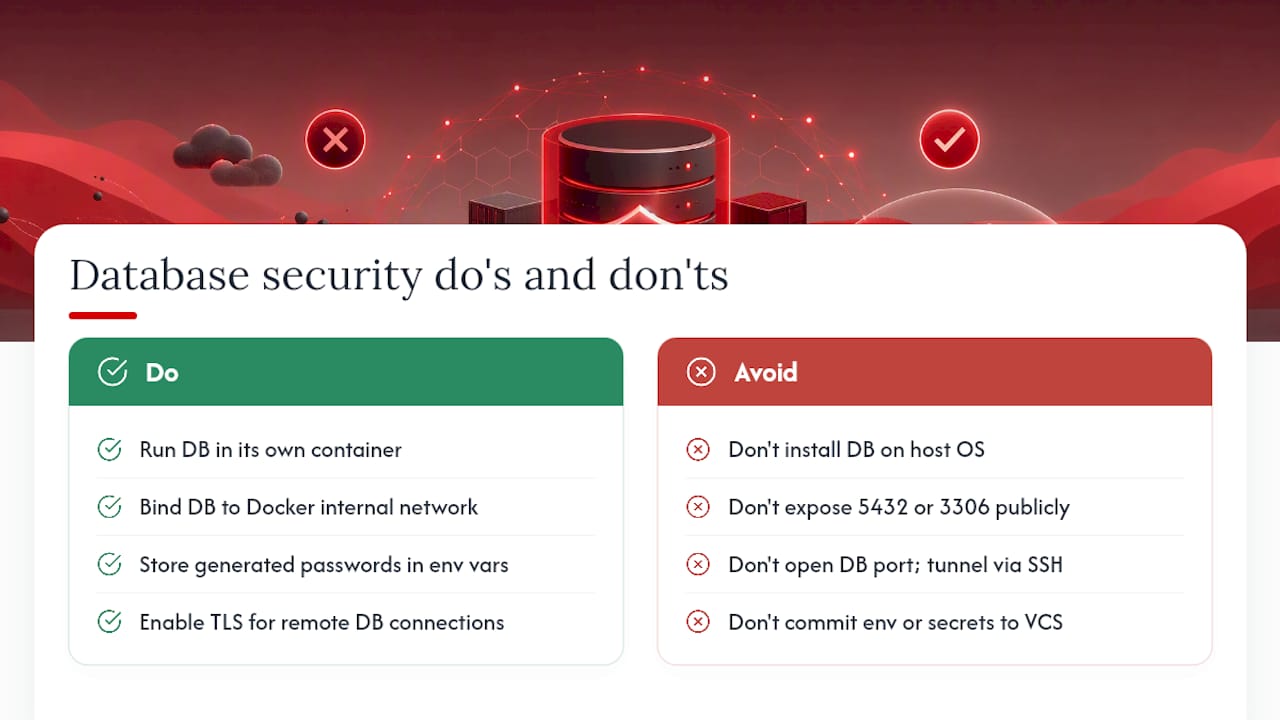
Run your database as its own container, never installed directly on the host OS. That keeps upgrades isolated and makes backups a matter of snapshotting a Docker volume rather than untangling a system-wide install.
Bind the database port to 127.0.0.1 or to the internal Docker network only, not to 0.0.0.0. Your application container talks to Postgres or MySQL over the Docker bridge network by service name, and nothing outside the VPS ever needs direct access to port 5432 or 3306. If a teammate genuinely needs remote access for debugging, tunnel it through SSH rather than opening the port in UFW.
Use strong, generated passwords stored in environment variables, not hardcoded in your docker-compose.yml. A .env file kept out of version control (add it to .gitignore immediately) works for small projects; for anything with multiple contributors, a secrets manager or encrypted environment file prevents credentials from leaking through a git history.
Enable TLS for database connections when the client and server aren’t on the same machine, and rotate credentials whenever someone leaves the project or a key gets exposed in a log file by accident. It happens more often than you’d think, usually from a stack trace printed during debugging.
Finally, set connection limits and timeouts at the database level. A runaway script opening hundreds of connections can take down a small VPS faster than any external attack, and a sane max_connections setting is cheap insurance against your own code.
Automating Environment Setup With Scripts and Infrastructure as Code
Running the same fifteen commands by hand every time you spin up a VPS is where mistakes creep in. A missed firewall rule or a forgotten SSH hardening step is easy to overlook at 1 a.m., which is exactly why provisioning scripts exist.
An idempotent provisioning script can create your sudo user, harden SSH, install Docker, and configure the reverse proxy and firewall in one run, safe to execute more than once without breaking anything. That’s the key property to look for: idempotency means rerunning the script after a partial failure doesn’t duplicate users or corrupt configs.
For teams managing more than one server, tools like Ansible let you define your entire setup as a playbook: install packages, template config files, restart services, all from one YAML file you can version-control and review like any other code. Terraform handles the layer above that, provisioning the VPS instance itself, assigning IPs, and configuring DNS records, if your hosting provider exposes an API for it.
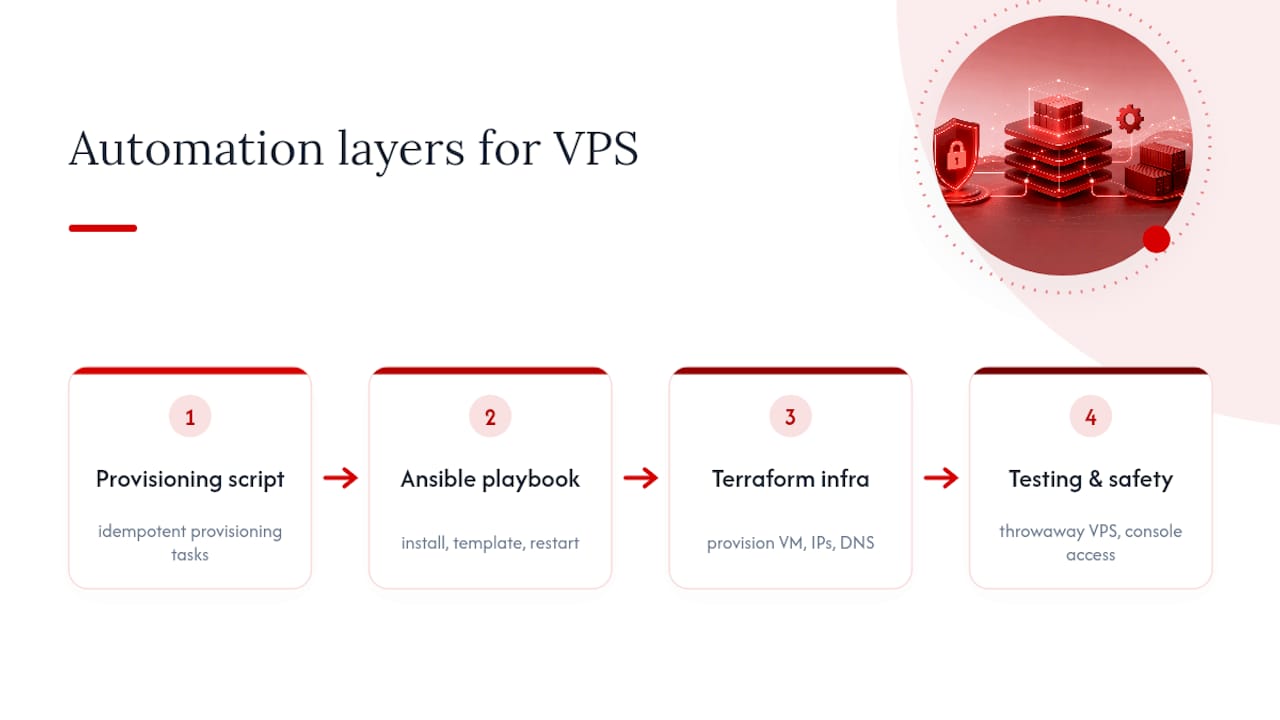
Whichever tool you pick, test scripts against a throwaway VPS before running them against anything with real data. Keep console or serial access to the server available while you test hardening steps. If an SSH configuration change locks you out, a web-based console through your host’s control panel is the only way back in without a support ticket.
Logging and Log Management Setup
Application logs scattered across /var/log, Docker’s own log driver, and nginx’s access logs become unreadable fast once you’re running more than one service. Centralizing them early saves hours of grep sessions later.
Configure Docker’s json-file log driver with size limits (max-size and max-file in your daemon config) so container logs don’t quietly fill your disk over a few months of uptime. Nginx’s access and error logs deserve the same treatment through logrotate, which ships with Ubuntu and just needs a config file pointing at your log paths with a rotation schedule.
For anything beyond a single-app server, ship logs to Grafana paired with Loki, a lightweight combination built specifically for this kind of setup, letting you search across every container’s output from one dashboard instead of SSHing in to tail files. Set log levels deliberately in your application code too: debug-level logging is useful in development but turns into noise (and a disk-space problem) if left on in a long-running staging environment.
Whatever stack you land on, decide what counts as an error worth alerting on versus routine noise before you wire up notifications. Alert fatigue from a poorly tuned logging setup is worse than no alerts at all.
User and Permission Management for Multi-Developer Collaboration
The moment a second developer needs access, your single sudo user setup stops working. Each person should get their own account with their own SSH key, never a shared login passed around in a group chat. Shared credentials make it impossible to know who did what when something breaks.
Use Linux groups to control what each account can touch. A developer who only needs to deploy code doesn’t need root access to the whole system, add them to a docker group so they can manage containers, and a project-specific group with write access to /srv/apps/theirproject instead of full sudo rights. Reserve sudo for whoever actually manages the server’s infrastructure.
For teams using Coolify or Cockpit, both tools support role-based access inside their own dashboards, so a junior developer can restart a service or check logs without ever touching SSH. That’s often the fastest way to onboard someone who’s more comfortable in a browser than a terminal.
Revoke access immediately when someone leaves a project. Delete their user account, remove their key from authorized_keys, and rotate any shared secrets (database passwords, API keys) they had access to. An old SSH key sitting on a server for a contractor who left six months ago is a quiet liability nobody remembers until it’s a problem.
Network Configuration and Port Management Beyond Firewall Basics
Allowing ports 80, 443, and SSH through UFW is the baseline, but a real developer setup runs more services than that, and each one needs a deliberate decision about who can reach it.
Internal services, your database, a Redis cache, a monitoring dashboard, should never bind to a public interface at all. Configure them to listen on 127.0.0.1 or the Docker internal network, so even if UFW rules got misconfigured, the service simply isn’t reachable from outside. This is the same principle behind keeping monitoring dashboards off the open internet: expose them only through an authenticated reverse proxy or a VPN, never directly.
If you’re running multiple projects on one VPS, give each Docker Compose stack its own isolated network rather than letting every container talk to every other container by default. That containment limits the blast radius if one project’s dependency gets compromised.
For anything that genuinely needs remote access outside HTTP traffic, like a database client connecting from your laptop, use an SSH tunnel rather than opening a new firewall rule. ssh -L 5432:localhost:5432 user@yourserver gives you a temporary, encrypted path to the database without exposing the port to the wider internet at all. It’s a few extra keystrokes for a meaningfully smaller attack surface.
When Does a VPS Actually Make Sense for Developers?
Choose a VPS when you need production parity, a demo your whole team can reach, or specific CPU and storage needs. For throwaway prototypes, local containers or a managed PaaS are usually faster. Persistent environments and custom networking are the real signal a VPS is the right call.
AceRDP Gets You Past Setup and Into Building
Everything in this guide assumes you already have a server to harden, and that’s where the choice of host actually matters. Spin up a VPS and you skip the provisioning wait: instant deployment on modern hardware with NVMe storage means your Ubuntu LTS instance is ready for the sudo-user-and-SSH-key routine within minutes, not the hours some providers take to hand over root access.
Many providers run both Linux and Windows environments across multiple locations, so whether your stack is Docker and nginx on Ubuntu or a Windows RDP setup for a .NET project, the underlying hardware doesn’t have to be a bottleneck. Built-in DDoS protection means the security hardening from Section 2 isn’t the only defense layer. If you’re running client demos or a small team’s shared staging server, low latency can improve how responsive the app feels during a live walkthrough, not just in a speed test.
Self-managed VPS makes sense once you’re comfortable owning the stack end to end; a hosted plan with responsive support makes sense when you’d rather spend that time writing code instead of debugging kernel updates. Check current plans and provision a server at AceRDP and have your development environment running before lunch.
— AceRDP
Sources
FAQ
What Is the First Thing to Do on a New VPS?
Update your packages, then immediately create a non-root sudo user with SSH key authentication before you install anything else. Skipping this step is how servers get compromised within minutes of going live.
Is Ubuntu or Debian Better for a Development Server?
Ubuntu LTS is the better default for most developers because of its wider documentation and package support, while Debian suits minimalist, stability-focused production setups. Either works fine once hardened correctly.
Do I Need Docker for a Developer VPS Setup?
Docker isn’t mandatory, but it makes your VPS behave identically to your CI pipeline and production environment, which eliminates a whole category of “works on my machine” bugs.
Should I Use Cockpit or Coolify?
Use Cockpit for a lightweight, browser-based view of server health and services; use Coolify when you want automated, push-button deployments closer to a self-hosted PaaS experience.
Can I Just Use a Managed Hosting Plan Instead of Configuring Everything Myself?
Yes. A provider like AceRDP handles the provisioning and hardware side instantly, so you can jump straight into the security hardening and tooling steps covered in this guide without waiting on server setup.