Docker on VPS: A Practical Setup and Deployment Guide

Docker on VPS: A Practical Setup and Deployment Guide
Yes, Docker runs well on a VPS, as long as the plan uses KVM virtualization rather than legacy OpenVZ. A workable starting point is 1 vCPU, 2GB RAM, and NVMe storage, though most people are happier with 2 vCPUs and 4GB once they add a database or two.
Here is the fastest path from a blank server to a running container:
- SSH in and update the base system with
apt update && apt upgrade -y. - Add Docker’s official apt repository (not the distro’s bundled
docker.iopackage, which lags behind and often skips Compose v2 entirely). - Install the Engine and plugins with a single
apt install docker-ce docker-ce-cli containerd.io docker-buildx-plugin docker-compose-plugincommand, then confirm withdocker run hello-world.
Pro Tip: Run docker info | grep -i cgroup right after install. If cgroup v2 isn’t active on an older kernel, some resource limits and rootless features silently won’t work.
One warning worth repeating: skip the tempting snap install docker or apt install docker.io shortcuts. They install, technically, but you’ll be chasing missing Compose commands and outdated Engine versions within a week.
Key Takeaways
Docker deploys reliably on a KVM VPS when you install from Docker’s official apt repository, size for your real workload, and set daemon defaults like live-restore and log rotation from day one.
| Point | Details |
|---|---|
| Choose KVM, not OpenVZ | KVM virtualization supports Docker’s kernel requirements; older OpenVZ plans often don’t. |
| Install from Docker’s repo | Skip docker.io and use Docker’s official apt repository for current releases and Compose v2. |
| Size for your actual stack | Budget 2 to 4GB RAM for a few services, 8GB and 4 vCPUs once you pass roughly five services. |
| Automate TLS with Traefik | Use Traefik and Docker labels for automatic HTTPS instead of manual certificate management. |
| Back up volumes, not just images | Schedule restic or database dumps separately, and test restores periodically. |
| Run it on capable hardware | AceRDP’s AMD Ryzen and NVMe-based KVM VPS plans cut build times and improve container I/O for Docker workloads. |
Essential Best Practices for Docker on VPS
- Prepare Your VPS for Docker on a VPS Deployment
- How Do You Install Docker on an Ubuntu VPS?
- Should You Run Docker Without Sudo?
- Deploying a Minimal Node.js App With Docker Compose
- Networking Basics: Port Mapping vs. Reverse Proxy
- How Much VPS Do You Actually Need for Docker?
- Locking Down Docker on a Single VPS
- Backups and Monitoring for a Single-Host Setup
- Fixing the Most Common Docker-on-VPS Errors
- Why Server Performance Shapes Your Docker Workflow
- Docs and Guides Worth Bookmarking
- What Actually Matters When You Run Docker on a VPS
- Get a VPS Built for Docker Workloads
- Sources
Prepare Your VPS for Docker on a VPS Deployment
Not every VPS plan is built the same way, and Docker cares about the difference. The single biggest factor is virtualization type. KVM (Kernel-based Virtual Machine) gives you a full virtual kernel and proper support for the cgroups and namespaces Docker depends on. Older OpenVZ containers share a host kernel and frequently choke on Docker’s own containerization layer, according to independent VPS guides. If your provider doesn’t clearly state KVM, ask before you commit a plan.
Ubuntu 22.04 LTS and 24.04 LTS are the safest choices for Docker right now, with 26.04 usable once its packages stabilize in Docker’s official repository. Debian 12 works nearly as well if you prefer it. Stick to LTS releases. Docker’s release cadence assumes a predictable, long-supported base, and chasing the newest non-LTS Ubuntu tends to break apt dependencies at the worst possible moment.
Before touching Docker itself, confirm four things:
- You have SSH access with a non-root sudo user already configured.
- At least 20GB of free disk space, since images, layers, and volumes accumulate faster than people expect.
- NVMe storage if you’re running a database inside a container. Standard SSDs work, but NVMe’s lower latency shows up immediately in write-heavy workloads like Postgres or MySQL.
- A basic firewall (
ufwor your provider’s panel) is enabled, with only SSH and your intended app ports open.
For a genuinely minimal hobby setup, 1 vCPU and 2GB RAM will run a handful of small containers without complaint. Push past three or four services, or add a database, and 4GB RAM becomes the more honest floor. Docker’s daemon itself is lightweight, but the images stacked on top of it are not.
How Do You Install Docker on an Ubuntu VPS?
Docker’s own apt repository is the method to use here, not the version bundled with Ubuntu. The distro package is often several minor versions behind and, critically, it typically ships without the Compose v2 plugin, which is now the standard way to run multi-container apps on a single host, as detailed in Docker’s official installation guide.
Here’s the full sequence, run as your sudo user:
-
Remove conflicting packages first. Older Ubuntu installs sometimes carry
docker.io,docker-compose, orpodman-dockerfrom previous attempts. Clear them withsudo apt remove docker.io docker-compose podman-docker containerd runcto avoid version conflicts later. -
Set up Docker’s apt repository. Create the keyring directory, pull Docker’s GPG key, and register the repository:
sudo apt update
sudo apt install ca-certificates curl
sudo install -m 0755 -d /etc/apt/keyrings
sudo curl -fsSL https://download.docker.com/linux/ubuntu/gpg -o /etc/apt/keyrings/docker.asc
sudo chmod a+r /etc/apt/keyrings/docker.asc
Then add the repo entry to
/etc/apt/sources.list.d/docker.list, pointing at your Ubuntu codename, exactly as Docker’s documentation walks through. -
Install the Engine and Compose plugin together. Run
sudo apt updateagain, then:sudo apt install docker-ce docker-ce-cli containerd.io docker-buildx-plugin docker-compose-pluginThis single command pulls in everything: the Engine, the CLI, the container runtime, BuildKit’s buildx tooling, and Compose v2 as a native plugin rather than a separate Python binary.
-
Pin a specific version if your stack demands it. Most people should take the latest stable release, but if a production app needs version consistency across environments, list available versions with
apt-cache madison docker-ceand install withdocker-ce=5:27.3.1-1~ubuntu.24.04~noble(adjusting the version string to what’s listed). -
Verify everything actually works. Four quick checks confirm a clean install:
sudo systemctl status dockershould showactive (running).docker --versionconfirms the Engine installed correctly.docker compose versionconfirms the Compose v2 plugin is present, distinct from the old standalonedocker-composebinary.sudo docker run hello-worldpulls a tiny test image and prints a confirmation message if networking, permissions, and the daemon are all functioning.
Installing through Docker’s own repository rather than distro packages also means future updates flow through your normal apt upgrade cycle instead of requiring manual binary swaps, which matters more than it sounds like once you’re managing more than one server.
If hello-world fails with a connection error, the daemon likely isn’t running yet. If it fails with a permission error, you’ve just hit the exact issue the next section solves.
Should You Run Docker Without Sudo?
Typing sudo before every Docker command gets old fast, and the fix is one line: sudo usermod -aG docker $USER. Log out and back in (or run newgrp docker) for the group change to take effect, then re-run docker run hello-world without sudo to confirm it worked.
Here’s the part a lot of quick-start guides skip: docker group membership is functionally equivalent to root access. Anyone in that group can mount the host filesystem inside a container and read or write anything on the system, a trade-off worth being deliberate about on a shared or multi-user server, per guidance from OVH’s VPS documentation. On a single-developer VPS this is a non-issue. On a box with multiple accounts, think twice before adding everyone.
A few daemon settings are worth setting now, before you have multiple containers running. Edit /etc/docker/daemon.json to keep containers running through daemon restarts, reduce network overhead, and cap log growth to prevent disk exhaustion.

Pro Tip: Restart the daemon after editing daemon.json with sudo systemctl restart docker, then run docker info to confirm your settings actually took. A typo in the JSON will make the daemon fail silently on some Ubuntu versions.
Deploying a Minimal Node.js App With Docker Compose
The fastest way to prove your setup works is to ship something real, and a small Node.js app with a database backing it covers most of what you’ll actually build later. Here’s the minimal project layout:
myapp/
  Dockerfile
  docker-compose.yml
  app/
    index.js
    package.json
Your Dockerfile can be a handful of lines:
FROM node:20-alpine
WORKDIR /app
COPY app/package*.json ./
RUN npm install --production
COPY app/ .
CMD ["node", "index.js"]
The docker-compose.yml ties the app and a Postgres database together:
services:
  web:
    build: .
    ports:
      - "3000:3000"
    environment:
      - DATABASE_URL=postgres://user:pass@db:5432/mydb
    depends_on:
      - db
  db:
    image: postgres:16-alpine
    volumes:
      - dbdata:/var/lib/postgresql/data
    environment:
      - POSTGRES_USER=user
      - POSTGRES_PASSWORD=pass
      - POSTGRES_DB=mydb
volumes:
  dbdata:
From there, the workflow is four commands you’ll use constantly:
docker compose up -d --buildbuilds the image and starts both services in the background.docker compose psconfirms both containers are up and shows their port mappings.docker compose logs -f webtails the app’s output live, which is where you’ll spend most of your debugging time.docker compose exec web shdrops you into a shell inside the running container for quick inspection.
Notice the dbdata volume in the compose file. That’s what keeps your Postgres data alive across container restarts and rebuilds, database state living inside a container with no volume disappears the moment you run docker compose down.
Rolling back is simpler than people expect if you tag images deliberately. Instead of always building latest, tag releases as myapp:v1.2 and reference that tag in your compose file. Reverting a bad deploy becomes changing one line and running docker compose up -d again, rather than trying to reconstruct what the previous build looked like.
Networking Basics: Port Mapping vs. Reverse Proxy
Port mapping, the "3000:3000" syntax from the example above, is the right default for a single app on a VPS. It binds a container’s internal port to a host port, and your firewall controls the rest. Host network mode (network_mode: host) skips this translation entirely, giving the container direct access to the host’s network stack, but it also means the container can bind any port and loses Docker’s network isolation. Reserve it for cases where you genuinely need raw network performance, like a VPN or monitoring agent, and default to port mapping everywhere else.
Once you’re running more than one web-facing service on the same VPS, a reverse proxy stops being optional. Traefik is the practical choice for single-host Compose stacks because it discovers containers automatically through Docker labels and handles Let’s Encrypt certificate issuance without manual renewal scripts, a pattern widely recommended for Compose-based VPS deployments. Add labels to a service in your compose file, and Traefik routes traffic and provisions HTTPS for that subdomain automatically.
Two networking details trip people up constantly:
- Your VPS firewall (
ufw) needs ports 80 and 443 open for Traefik, but your individual app containers should generally NOT expose their ports directly to the host once Traefik sits in front of them. - Some VPS providers apply NAT or additional network-layer firewalls beyond what’s configured on the server itself, so a port that’s open in
ufwcan still be blocked upstream. Check your provider’s control panel firewall rules if a service is unreachable despite correct local configuration.
Pro Tip: Run Traefik itself in its own compose stack, separate from your application stacks. It makes upgrading Traefik independently from your apps far less risky.
How Much VPS Do You Actually Need for Docker?
Sizing depends entirely on what’s running, not on some universal Docker overhead figure. A hobby stack of one to three lightweight services, say a blog, a small API, and Traefik, comfortably fits on 1 to 2 vCPUs and 2 to 4GB RAM, especially with NVMe storage keeping image pulls and volume writes fast.
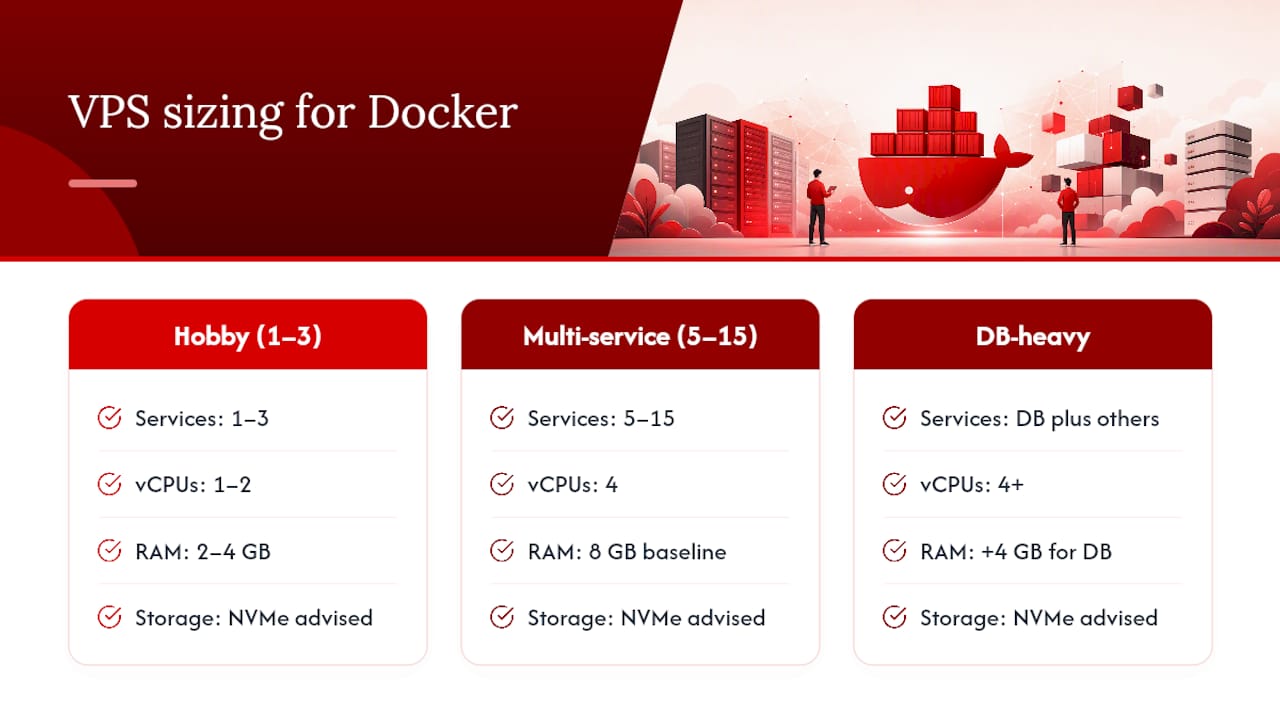
Once you’re running 5 to 15 services, plan for 4 vCPUs and 8GB RAM as a realistic baseline. Each container carries some fixed memory overhead beyond its actual workload, and that adds up faster than the sum of each service’s advertised requirements suggests.
Database-heavy workloads change the math again. Postgres or MySQL under real load want dedicated memory for query caching and connection pools, so a single database container can reasonably justify 4GB of RAM on its own before you’ve added anything else.
For small numbers of services, modest CPU and RAM with NVMe storage generally suffice. Larger multi-service stacks and database-heavy workloads require more CPU and RAM to run reliably.
A modest swap file (1 to 2GB) is worth adding on smaller plans as insurance against short memory spikes, but treat swap as a safety net, not a substitute for enough RAM. If you find yourself managing containers across more than one VPS to handle load, that’s the actual signal to look at Docker Swarm or Kubernetes rather than stretching Compose further than it’s meant to go.
Locking Down Docker on a Single VPS
Security on a single-host Docker setup comes down to a handful of habits, not a complex hardening framework. Keep both the host OS and Docker itself current with regular apt upgrade runs, since Engine vulnerabilities do get patched and left unpatched, they’re a real attack surface.
Never run an untrusted image as root inside the container just because it’s the path of least resistance. Most official images support a USER directive or accept a --user flag at runtime, and using it limits what an attacker can do even if they compromise the process inside the container. Pair that with --read-only on containers that don’t need to write to their own filesystem, and set explicit memory and CPU limits (--memory=512m --cpus=1) so one misbehaving container can’t starve everything else on the box.
- Enable log rotation in
daemon.json(covered earlier) so runaway container logs don’t fill your disk overnight. - Run untrusted or third-party images with
--read-onlyand a non-root--userwhere the image supports it. - Set explicit resource limits on every container in production, not just the ones you suspect might misbehave.
- Review
docker psanddocker imagesperiodically. Unused images and stopped containers quietly accumulate and expand your attack surface.
Pro Tip: Run docker system prune -a monthly on a hobby VPS to reclaim disk space from dangling images and stopped containers, but check docker ps -a first so you don’t accidentally wipe something you meant to restart later.
Rootless Docker, running the daemon itself under a non-root user, is worth knowing about even if you don’t adopt it immediately. It meaningfully reduces the blast radius of a daemon compromise, but it comes with real limitations: some networking features and certain storage drivers behave differently or aren’t fully supported. For a single-developer hobby VPS, standard Docker with the group-membership trade-off documented above is usually the pragmatic choice.
Backups and Monitoring for a Single-Host Setup
Your container data lives in volumes, and volumes need a backup plan independent of Docker itself. For most single-VPS setups, a scheduled restic job backing up your volume directories, or a cron-triggered pg_dump for database containers specifically, covers the essentials without added infrastructure.
- Back up named volumes with
resticor a simplersyncto off-site storage, scheduled nightly via cron. - Dump databases separately with
pg_dumpormysqldumprather than relying solely on filesystem-level volume copies. - Add lightweight monitoring with
cAdvisorfor per-container resource stats, or a hosted alternative if you’d rather not self-host the dashboard. - Set basic alerting on disk usage and CPU, since a single VPS filling its disk silently is the most common cause of unplanned downtime.
- Actually test a restore occasionally. A backup you’ve never restored from is a hope, not a plan.
Fixing the Most Common Docker-on-VPS Errors
Most Docker problems on a fresh VPS trace back to one of four causes, and each has a fast diagnostic path:
-
“Cannot connect to the Docker daemon” usually means the daemon isn’t running. Check with
sudo systemctl status docker, restart it withsudo systemctl restart docker, and checksudo journalctl -u docker -n 50for the underlying error if it won’t start. -
“docker compose: command not found” means the Compose v2 plugin never installed. Run
sudo apt install docker-compose-plugindirectly, then confirm withdocker compose version. This is a frequent gap when Docker was installed through a distro package instead of Docker’s own repository. -
“permission denied while trying to connect to the Docker daemon socket” almost always means your user isn’t actually in the docker group yet, or the session hasn’t refreshed. Re-run
groups $USERto confirm membership, and log out and back in if the group was added recently, per the community troubleshooting discussion on Docker’s forums. -
Containers failing to start after an Engine upgrade often comes down to a volume permission mismatch introduced by the new version. Check the release notes for the version you upgraded to, and inspect ownership on your volume directories with
ls -labefore assuming the image itself is broken.
Why Server Performance Shapes Your Docker Workflow
Docker’s day-to-day speed depends heavily on the hardware underneath it, something that only becomes obvious once you’ve worked on a slow one. Image pulls, layer extraction, and build steps are all CPU and disk-bound operations, which is exactly where AceRDP’s AMD Ryzen processors and NVMe storage show up in practice: faster docker build runs, quicker docker compose up on multi-service stacks, and noticeably better I/O for database containers writing to disk constantly.
Instant provisioning matters more than it sounds like when you’re testing a deployment approach across regions. Spinning up a KVM VPS in a different location to check latency for a specific audience, then tearing it down, is realistic when provisioning takes minutes instead of a support ticket.
- AMD Ryzen CPUs reduce build and pull times, which compounds across a CI/CD workflow running many builds per day.
- NVMe storage speeds up container I/O, particularly noticeable for database-backed apps under real traffic.
- Multi-location KVM plans (Netherlands, US) let you test latency-sensitive deployments close to your actual users.
Docs and Guides Worth Bookmarking
Keep Docker’s official Ubuntu install guide close for command syntax that changes between releases. The OVH VPS Docker guide covers post-install permissions in more depth, and Linuxize’s Ubuntu 26.04 walkthrough is a solid second reference for newer releases.
What Actually Matters When You Run Docker on a VPS
Most Docker tutorials treat installation as the hard part. It isn’t. The apt commands are copy-paste simple, and anyone can get hello-world running in ten minutes. The part that actually separates a stable deployment from a fragile one is what happens after: whether you set log rotation before your disk fills up, whether you know what live-restore does before a daemon crash takes your app down with it, whether you’ve tested a restore instead of just scheduling a backup.
Conventional advice also overindexes on orchestration too early. Plenty of guides nudge hobbyists toward Kubernetes before they’ve even outgrown a single Compose file. For the vast majority of personal projects and small production apps, a well-configured Compose stack on one solid VPS handles the job completely, and adding orchestration complexity before you need it just gives you more ways to misconfigure something.
If there’s one priority to take from this guide, it’s sequencing: get the install right, get permissions and daemon settings right, then worry about scaling. Skipping straight to advanced patterns on infrastructure that isn’t stable yet is how weekend projects turn into weekend debugging sessions.
— AceRDP
Get a VPS Built for Docker Workloads
AceRDP gives you the one thing most budget VPS plans skimp on for Docker: raw build and I/O speed. Between AMD Ryzen CPUs and NVMe storage, the kind of image builds and database writes covered throughout this guide run noticeably faster than on older shared-core hardware, and instant provisioning means you can spin up a fresh KVM instance to test a deployment the moment you finish reading this sentence.
Every plan runs on KVM, so nothing in this guide requires workarounds for legacy virtualization limits. You get root access from the first login, DDoS protection included, and a choice of Netherlands or US locations if latency to your users matters. Whether you’re standing up the hobby Node.js stack from this guide or something closer to production with five or more services, the sizing tiers here map cleanly onto AceRDP’s VPS plans. Pick a plan sized to the workload you just read about, and you’ll have Docker installed and your first container running within the hour.