Harden a Linux VPS in 10 Minutes for Sysadmins

Harden a Linux VPS in 10 Minutes for Sysadmins
Do these five things now to stop the majority of automated attacks on a Linux VPS: enable SSH key-only logins, disable root SSH, turn on a host firewall with default-deny, install fail2ban, and apply pending security updates. Together they close the doors that scanners and bots probe within minutes of a server going live. Everything else in Linux VPS security builds on that foundation, from SELinux enforcement to disk encryption to CIS-aligned golden images.
TL;DR:
- Enabling SSH key-only logins and disabling root SSH access are critical steps that prevent the majority of automated brute-force attacks.
- A default-deny firewall configuration should be implemented, allowing only necessary ports such as 22 and 443, with IPv6 rules checked separately.
- Installing fail2ban and using two-factor authentication significantly reduce the risk of successful login attempts and brute-force breaches.
- Automating security updates minimizes vulnerabilities, while audit logs and remote log collection are vital for detecting and investigating breaches.
- Applying CIS benchmarks to build locked-down, golden images ensures consistent, repeatable hardening for all servers, reducing configuration drift.
Table of Contents
- SSH Hardening: Locking Down Your Front Door
- Firewall and Network Hardening for a Secure Linux VPS
- Fail2ban, Rate Limiting, and SSH Two-Factor Authentication
- Patching Strategy: Automated Updates Without Breaking Production
- Audit Logging and Monitoring: Knowing When Something Went Wrong
- Kernel and File-Permission Hardening: Sysctl Defaults That Matter
- Application-Layer Defenses: WAFs, Localhost Binding, and Container Safety
- CIS Benchmarks and Golden Images for Repeatable Hardening
- The 10-Minute Hardening Checklist for a Fresh VPS
- Setting Up Intrusion Detection With Snort or OSSEC
- Disk Encryption: Protecting Data if the Physical Server Is Compromised
- Backup Strategy: Recovering Cleanly After a Compromise
- SELinux and AppArmor: Mandatory Access Control That Limits the Blast Radius
- Securing Network Services: Cut What You Don’t Use, Configure TLS Properly
- Why Provider Infrastructure Is Part of Your Security Posture
- Get a Hardened Linux VPS Running in Minutes
- Sources
- FAQ
SSH Hardening: Locking Down Your Front Door
SSH misconfiguration causes more VPS breaches than any other single factor, and the fix takes about fifteen minutes. Before touching sshd_config, create a non-root account with sudo privileges: adduser deploy && usermod -aG sudo deploy. Lock or remove any leftover default accounts your hosting provider might have preloaded.
Generate an SSH key pair on your local machine (ssh-keygen -t ed25519) and copy the public key to the new user with ssh-copy-id deploy@your-server-ip. Once that works, open /etc/ssh/sshd_config and set these directives:
PermitRootLogin no— root can no longer authenticate over SSH at allPasswordAuthentication no— forces key-based login onlyPubkeyAuthentication yes— confirms key auth is activeAllowUsers deploy(orAllowGroups sshusers) — whitelists exactly who can connectX11Forwarding noandAllowTcpForwarding no— closes tunneling paths most servers never useLoginGraceTime 30andClientAliveInterval 300/ClientAliveCountMax 2— kills stalled or abandoned sessions fast
For cipher hygiene, restrict the negotiated algorithms to modern ones only: add Ciphers [email protected],[email protected] and KexAlgorithms curve25519-sha256 to the config. Test what your server actually negotiates by running ssh -vv deploy@your-server-ip from another machine and scanning the handshake output for weak fallback algorithms.
Changing the SSH port above 1024 is a common recommendation, but treat it as a secondary measure. It cuts down automated scan noise in your logs, nothing more. The CISA exposure-reduction guidance is clear that disabling root login and requiring keys are the controls doing the real work, not port obscurity.
Pro Tip: Never restart sshd from the only session you have open. Open a second terminal, connect with the new key and settings, confirm it works, and only then run sudo systemctl restart sshd in the first session. If you lock yourself out, most providers offer a web-based console to recover.
Firewall and Network Hardening for a Secure Linux VPS
A default-deny firewall is non-negotiable on any internet-facing box. The rule is simple: block everything inbound, then open only the ports a service genuinely needs. On Ubuntu, UFW makes this fast:
sudo ufw default deny incoming
sudo ufw default allow outgoing
sudo ufw allow 22/tcp
sudo ufw allow 443/tcp
sudo ufw enable
On RHEL-based systems, firewalld handles the same job through zones: sudo firewall-cmd --zone=public --add-service=ssh --permanent followed by sudo firewall-cmd --reload. Whichever tool you use, check IPv6 rules separately. A lot of admins lock down IPv4 tightly and forget ip6tables or the UFW IPv6 default, leaving an open backdoor on the same interface.
If your VPS sits behind a cloud provider’s security groups, keep the host firewall running anyway. Host-based firewalls remain necessary even when network-level controls exist, because they stop lateral movement if the network layer is misconfigured or an attacker already has a foothold on another host in the same network. Duplicating your critical allow rules at both layers costs you nothing and buys real redundancy.
For administrative access specifically, don’t expose SSH to the entire internet if you can avoid it. Tools like WireGuard or Tailscale let you build a private overlay network, so SSH only accepts connections from inside that tunnel. A bastion host works the same way: one hardened jump box is the only server with a public SSH port, and everything else only accepts SSH from that bastion’s internal IP.
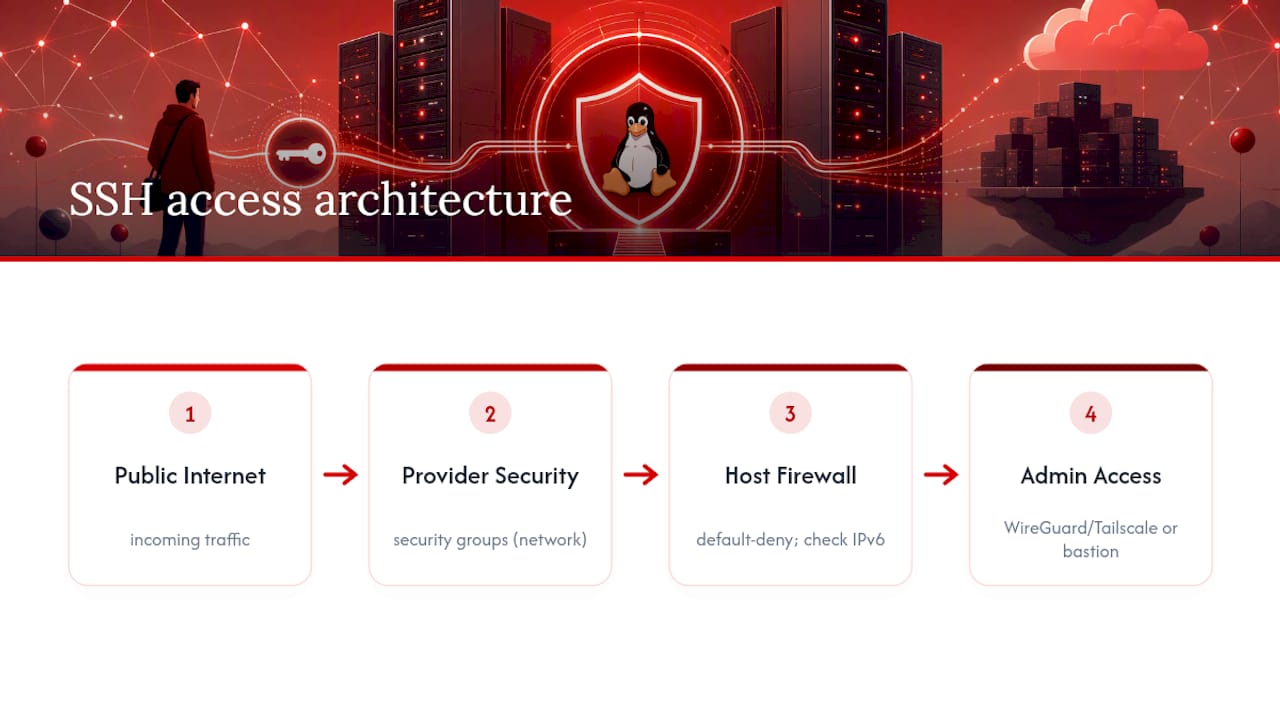
A few sysctl flags round out network hardening at the kernel level: enabling SYN cookies and reverse-path filtering (covered in detail later) reduces the odds a flood or spoofed packet ever reaches your applications in the first place.
Fail2ban, Rate Limiting, and SSH Two-Factor Authentication
Firewall rules stop unauthorized ports; they don’t stop someone hammering your login prompt from an allowed one. That’s fail2ban’s job. It watches your auth logs and bans offending IPs automatically, and it remains one of the most effective tools for blocking brute-force login attempts on any Linux VPS.
- Install it:
sudo apt install fail2ban(Ubuntu) orsudo dnf install fail2ban(RHEL). - Copy the default config to a local override so upgrades don’t wipe your settings:
sudo cp /etc/fail2ban/jail.conf /etc/fail2ban/jail.local. - In
jail.local, enable the SSH jail and set sane thresholds:
[sshd]
enabled = true
maxretry = 4
findtime = 600
bantime = 3600
- Add a jail for web login forms (WordPress, custom apps) if you run one, pointing at the relevant log path and failure regex.
- Restart the service:
sudo systemctl restart fail2ban.
UFW’s built-in rate limiting (ufw limit 22/tcp) is a lighter alternative that throttles repeated connections without maintaining ban lists, but it’s blunter. Fail2ban’s log-parsing approach catches patterns UFW simply can’t see, like distributed attempts across a slow-and-low botnet.
For anything with elevated risk, an admin panel, a payment backend, add a second factor. The libpam-google-authenticator package integrates TOTP codes into PAM, so SSH prompts for both your key and a rotating six-digit code. Hardware keys (YubiKey via FIDO2) work the same way and are harder to phish.
Pro Tip: Check fail2ban-client status sshd weekly during the first month. If you see your own IP getting banned after a typo or two, loosen maxretry slightly rather than disabling the jail.
Patching Strategy: Automated Updates Without Breaking Production
Every unpatched CVE on a public-facing VPS is a countdown timer. Automating security patches closes that window without requiring you to babysit the server daily.
On Ubuntu and Debian, sudo apt install unattended-upgrades followed by sudo dpkg-reconfigure unattended-upgrades enables automatic installation of security-only updates. RHEL and its derivatives use dnf-automatic: install it, then enable the dnf-automatic-install.timer for the same effect.
- Configure unattended-upgrades to install security updates only, leaving feature updates for scheduled maintenance windows
- Enable automatic reboot for kernel updates during a defined low-traffic window, or evaluate a live-patching service if uptime requirements make reboots costly
- Subscribe to the CISA Known Exploited Vulnerabilities catalog or the NVD feed and route alerts to a channel your team actually watches
- For fleets larger than a handful of servers, manage configuration with Ansible so patch policy, firewall rules, and SSH settings deploy identically everywhere instead of drifting server by server
The combination of default-deny firewall, fail2ban, and current patches addresses the highest-impact hardening steps identified across server security checklists, and automating the patch piece is what keeps that protection intact six months from now instead of just on day one.
Audit Logging and Monitoring: Knowing When Something Went Wrong
Hardening reduces the odds of a break-in. Logging is what tells you one happened. auditd is the standard Linux audit framework, and a handful of watch rules cover the events that matter most:
-w /etc/passwd -p wa -k user_changes
-w /etc/sudoers -p wa -k sudo_changes
-w /root/.ssh/authorized_keys -p wa -k ssh_keys
-w /etc/cron.d -p wa -k cron_changes
Add these to /etc/audit/rules.d/hardening.rules and reload with augenrules --load. Review ausearch -k ssh_keys periodically, or better, ship the logs somewhere off the box entirely. If the server is compromised, local logs can be altered or deleted; a centralized collector (rsyslog to a remote host, or a managed log service) preserves the trail.
Set alerting thresholds rather than just collecting data passively:
- Repeated authentication failures beyond your fail2ban threshold, in case an attacker is rotating IPs
- Any new entry appended to
authorized_keysoutside a known deployment window - New sudoers entries or group membership changes
- Failed integrity checks from a file-monitoring tool
A single unmonitored authorized_keys file is one of the quietest persistence mechanisms an attacker can plant — it survives reboots, evades most process-based detection, and grants access indefinitely until someone notices.
AIDE (Advanced Intrusion Detection Environment) fills the file-integrity gap. Initialize a baseline database after hardening (aide --init), then run periodic checks against it. A flagged binary in /usr/bin that wasn’t part of a package update is the kind of signal auditd alone won’t catch.
Kernel and File-Permission Hardening: Sysctl Defaults That Matter
A handful of sysctl values, set once in /etc/sysctl.d/99-hardening.conf and applied with sysctl -p, close off entire classes of network-based attacks.
| Setting | Value | What it does |
|---|---|---|
net.ipv4.tcp_syncookies |
1 | Mitigates SYN flood attacks by not reserving state for half-open connections |
net.ipv4.conf.all.rp_filter |
1 | Enables reverse-path filtering, dropping spoofed source-address packets |
net.ipv4.conf.all.accept_redirects |
0 | Blocks ICMP redirect attacks that reroute traffic |
net.ipv4.conf.all.send_redirects |
0 | Stops the server from sending redirects it shouldn’t |
kernel.randomize_va_space |
2 | Enables full ASLR, randomizing memory layout against exploit attempts |
kernel.kptr_restrict |
2 | Hides kernel pointer addresses from unprivileged users |
kernel.dmesg_restrict |
1 | Restricts dmesg access, limiting kernel info leaks |
Beyond the kernel, file permissions are where privilege escalation usually starts. Run find / -xdev -type f -perm -0002 to locate world-writable files, and audit SUID binaries with find / -perm -4000 -type f 2>/dev/null. Any SUID binary you don’t recognize or don’t need deserves either a permission strip (chmod u-s) or removal.
Mount options add another layer: adding noexec,nosuid,nodev to /tmp and any non-system partitions in /etc/fstab stops a common exploitation pattern, dropping a payload into a writable directory and executing it directly from there.
The trade-off worth knowing: aggressive noexec mounts occasionally break software that expects to run temp-directory scripts, so test in staging before rolling this out to a production database server.
Application-Layer Defenses: WAFs, Localhost Binding, and Container Safety
A locked-down firewall does nothing to stop SQL injection or a malicious file upload arriving over port 443, because that traffic is allowed by design. Application-layer threats require a Web Application Firewall as a separate control, whether that’s ModSecurity running as an Nginx or Apache module, or a cloud-based WAF sitting in front of your origin server.
Beyond the WAF, reduce what’s reachable in the first place:
- Bind databases and caches (PostgreSQL, MySQL, Redis) to
127.0.0.1instead of0.0.0.0unless another server genuinely needs remote access - For legitimate remote database access, tunnel over SSH (
ssh -L 5432:localhost:5432 user@server) or route through the private VPN mentioned earlier, never expose the database port directly - If you run containers, never mount the Docker socket into a container unless you fully trust that image; it’s effectively root on the host
- Run containers as a non-root user, drop unnecessary Linux capabilities with
--cap-drop=ALLand add back only what’s needed, and mount filesystems read-only where the application allows it - Scan any user-uploaded files for malware before storing or serving them, and store uploads outside the web root so a malicious file can’t be executed directly
Each of these closes a path that firewall rules were never designed to cover.
CIS Benchmarks and Golden Images for Repeatable Hardening
Manually hardening every new VPS invites drift. Someone forgets a sysctl flag on server twelve, and that’s the one that gets popped. The fix is treating hardening as a build step, not a checklist you run by hand each time.
CIS Benchmarks Level 1 is the practical baseline for most production servers, balancing real security gains against compatibility. Reserve Level 2, which is considerably stricter, for workloads handling regulated or highly sensitive data where the operational friction is worth it.
- Build a golden image with Packer that already has SSH hardening, firewall rules, fail2ban, and CIS Level 1 controls baked in
- Validate the image against the benchmark using OpenSCAP before it goes into rotation
- Deploy new servers from that image rather than hardening each one by hand after provisioning
Baking controls into the image itself removes the human-error step entirely and makes patching or recovery a matter of redeploying from an updated image rather than fixing servers one at a time.
Pro Tip: If Level 2 controls break a specific application, don’t silently skip the whole benchmark. Document the deviation, apply every other applicable control, and revisit that one exception during your next update cycle.
The 10-Minute Hardening Checklist for a Fresh VPS
This is the sequence to run the moment a new Linux VPS boots, before you install anything else.
- Update packages:
sudo apt update && sudo apt upgrade -y(Ubuntu) orsudo dnf upgrade -y(RHEL). - Create a sudo user:
adduser deploy && usermod -aG sudo deploy. - Copy your SSH public key:
ssh-copy-id deploy@your-server-ip. - Confirm key login works in a second terminal before changing anything else.
- Edit
/etc/ssh/sshd_config: setPermitRootLogin noandPasswordAuthentication no. - Restart SSH from your original session:
sudo systemctl restart sshd. - Enable the firewall:
sudo ufw default deny incoming && sudo ufw allow 22/tcp && sudo ufw enable(or the firewalld equivalent). - Install and start fail2ban:
sudo apt install fail2ban && sudo systemctl enable --now fail2ban. - Enable automated security patching:
sudo dpkg-reconfigure unattended-upgrades. - Verify what’s actually listening:
sudo ss -tulpnand close anything you don’t recognize.
Always keep a second administrative session open while applying SSH and firewall changes, and know your provider’s console recovery path before you need it. A lockout on a brand-new server costs you ten minutes; a lockout on a production server costs you an incident report.
Run through this list distro-agnostic style: the commands differ between apt and dnf, but the order of operations, update, user, keys, verify, then lock down, stays identical everywhere.
Setting Up Intrusion Detection With Snort or OSSEC
Firewalls and fail2ban block known-bad patterns. An intrusion detection or prevention system watches for behavior that looks wrong even when no single rule technically triggers it. Snort operates as a network-based IDS, inspecting packet traffic against a ruleset for exploit signatures, port scans, and protocol anomalies. It can run in passive detection mode or, configured as an IPS, actively drop malicious packets inline.
OSSEC takes a host-based approach instead, watching log files, checking file integrity, and monitoring rootkit indicators directly on the server. For a single Linux VPS, OSSEC tends to be the more practical starting point since it doesn’t require the network tap or mirrored traffic Snort benefits from in a full deployment.
A minimal OSSEC setup covers three areas: log-based analysis of auth and application logs, file-integrity monitoring similar to AIDE but with real-time alerting, and active response rules that can auto-block an IP after suspicious activity, working alongside fail2ban rather than replacing it.
Neither tool is a install-and-forget solution. Both need tuned rulesets, since default configurations generate noisy alerts that get ignored within a week. Budget time in your first month to whitelist known-good behavior and sharpen thresholds, the same tuning discipline that makes fail2ban’s ban rate useful instead of annoying.
For most single-server deployments, OSSEC plus the auditd and AIDE setup covered earlier gives meaningful detection coverage without the operational overhead of running full network IDS infrastructure.
Disk Encryption: Protecting Data if the Physical Server Is Compromised
Firewall and SSH hardening protect a running server. They do nothing if someone gets physical or hypervisor-level access to the underlying disk, pulls a snapshot, or the storage media is later repurposed without being wiped.
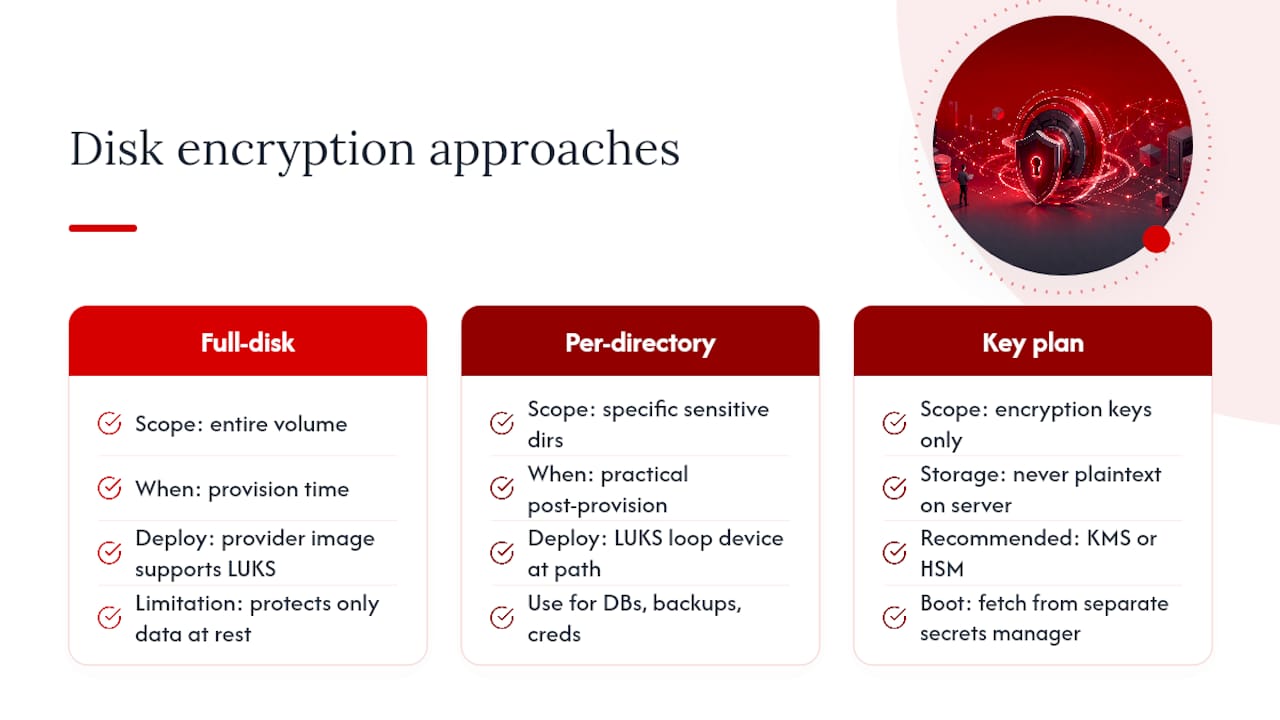
Full-disk encryption with LUKS (Linux Unified Key Setup) addresses that gap. On a fresh VPS, this typically means encrypting the volume at provisioning time, since converting a live root partition to encrypted storage after the fact usually requires a rebuild. Most VPS providers that support custom images let you specify LUKS encryption during initial deployment.
Where full-disk encryption isn’t practical, encrypt specific sensitive directories instead: database data directories, backup staging folders, or anywhere credentials and customer data land on disk. Tools like ecryptfs or a LUKS-encrypted loop device mounted at a specific path cover this without touching the whole filesystem.
Encryption keys need their own protection plan. Storing the LUKS passphrase in plaintext on the same server defeats the purpose entirely, use a key management service, a hardware security module if your workload justifies it, or at minimum a separate secrets manager the server queries at boot rather than a key baked into a startup script.
One caveat worth stating plainly: disk encryption protects data at rest, not data in use. Once the volume is mounted and the server is running, an attacker with root access through a compromised application can still read live data in memory or on the decrypted filesystem. Encryption is one layer in the stack covered throughout this guide, not a substitute for the rest of it.
Backup Strategy: Recovering Cleanly After a Compromise
A compromised server is not the time to discover your backups were also on that server. Store backups on separate infrastructure, ideally a different provider or at minimum a different storage volume with independent credentials, so an attacker who roots your VPS can’t also delete or encrypt your recovery point.
Automate the schedule rather than relying on memory: a daily incremental backup with weekly full snapshots covers most workloads, adjusted based on how much data churn your application generates. Tools like restic or borgbackup support encrypted, deduplicated backups pushed to remote storage, which keeps both the transfer and the stored copy protected.
Test restores on a schedule, not just when disaster strikes. A backup nobody has ever restored from is a hypothesis, not a safety net. Quarterly restore drills to a throwaway VPS confirm the process actually works and that the backup isn’t silently corrupted.
If compromise does happen, resist the urge to simply restore the same image and move on. Determine how the attacker got in first, an unpatched CVE, a leaked key, a weak application credential, because restoring a compromised configuration just resets the clock until the same exploit works again. Rebuild from a hardened golden image rather than the compromised server’s own backup where possible, then selectively restore application data after verifying it wasn’t tampered with. Rotate every credential the server held: SSH keys, database passwords, API tokens, and any secrets that were accessible from that host.
SELinux and AppArmor: Mandatory Access Control That Limits the Blast Radius
Every layer covered so far tries to keep attackers out. Mandatory Access Control frameworks assume they’ll eventually get in anyway and limit what they can do once inside. SELinux, the default on RHEL and Fedora, and AppArmor, the default on Ubuntu and Debian, both restrict what a process can access regardless of the permissions its user account holds.
The instinct many admins have when SELinux throws a denial is to set it to permissive or disable it entirely. Resist that instinct. SELinux and AppArmor running in enforcing mode materially limit what a compromised service can do, even after an attacker gains code execution through a vulnerable application. A web server exploit that would otherwise let an attacker read /etc/shadow or write to arbitrary system directories gets blocked at the MAC layer instead.
Check your current mode with sestatus (SELinux) or aa-status (AppArmor). If you hit a denial, don’t disable the policy, generate a targeted exception instead. audit2allow on SELinux systems reads denial logs and generates a custom policy module scoped to exactly what the application needs, nothing broader.
Learning to operate with enforcing mode on takes longer upfront than flipping it off, but it’s one of the few controls on this list that keeps working after every other layer has already failed.
Securing Network Services: Cut What You Don’t Use, Configure TLS Properly
Every running service is a potential entry point, including ones you forgot were installed. Run ss -tulpn right after provisioning and again periodically to see what’s actually listening. Disable and mask anything you don’t recognize or don’t need: sudo systemctl disable --now servicename && sudo systemctl mask servicename. A default install often ships with services like avahi-daemon or cups that a headless VPS never needs.
For services you keep, TLS configuration is where a lot of admins cut corners. Disable TLS 1.0 and 1.1 entirely; both have known weaknesses and most compliance frameworks no longer accept them. Configure your web server for TLS 1.2 minimum, with TLS 1.3 preferred where your application stack supports it. Use Mozilla’s SSL configuration generator as a starting point for cipher suite selection rather than hand-picking ciphers from memory, it stays current with deprecated algorithm guidance in a way a static article can’t.
Certificate management should be automated. Let’s Encrypt with certbot handles issuance and renewal without manual intervention, removing the expired-certificate outage that still catches teams off guard. Set up a renewal check in your monitoring so an unexpected renewal failure gets caught weeks before expiration, not the morning after.
Finally, verify HSTS headers are set on any service serving HTTPS, forcing browsers to refuse downgrade attempts to plain HTTP on subsequent visits.
Why Provider Infrastructure Is Part of Your Security Posture
Hardening a Linux VPS well still assumes the ground you’re standing on is solid. The underlying host, network, and provisioning tooling matter just as much as your sshd_config.
AceRDP runs its Windows RDP and KVM VPS hosting on modern AMD Ryzen infrastructure, which gives the CPU headroom that fail2ban, auditd, and a WAF all quietly consume in the background without you noticing a performance hit. Servers get provisioned through an automated platform with DDoS protection built in at the network layer, which matters because no amount of sysctl tuning stops a volumetric flood aimed at the provider’s edge instead of your box.
Multiple deployment locations and instant provisioning also make the golden-image workflow described earlier practical rather than theoretical. Spinning up a hardened image to test a CIS control, or rebuilding clean after an incident, only works well when provisioning takes minutes and support is actually responsive when something goes sideways.
— AceRDP
Get a Hardened Linux VPS Running in Minutes
Everything in this guide assumes you’re starting from a server you can actually trust at the infrastructure layer, and that’s where the choice of host stops being an afterthought. AceRDP runs Linux and Windows VPS plans on AMD Ryzen hardware with NVMe storage, DDoS protection at the network edge, and an automated provisioning platform that gets a fresh server ready in minutes rather than hours.

That speed matters for the golden-image approach covered above: you can deploy a clean instance, apply your CIS Level 1 baseline and SSH hardening, and have it validated and running well within a single session, then repeat that exact process across multiple locations without configuration drift creeping in. Support is available around the clock if something in your hardening process needs a provider-side check, whether that’s confirming a firewall rule at the network layer or troubleshooting provisioning on a new instance.
If you’re rebuilding after an incident or just tired of hardening a host you don’t fully trust, check the current VPS plans and get a new instance provisioned today.
Sources
The guidance above draws on published hardening standards rather than guesswork. The CISA exposure-reduction resources cover attack-surface reduction in more depth than this article has room for. CIS Benchmarks remain the industry reference for baseline configuration standards across distributions. For tooling, the fail2ban project documentation covers jail configuration well beyond the SSH and web examples here, and Red Hat’s own security guidance is worth bookmarking if you’re managing RHEL or CentOS systems specifically.
- CISA — Exposure reduction resources
- Hive Security — SQL injection complete guide (2026)
- LinuxTeck — Linux server hardening checklist
FAQ
Which Linux distribution is best for VPS security?
Debian, Ubuntu LTS, and RHEL-based distributions (RHEL, Rocky, AlmaLinux) all support the full hardening stack covered here, including SELinux or AppArmor, unattended-upgrades or dnf-automatic, and long-term security patch support. The better distribution is the one whose package ecosystem and support lifecycle match your team’s operational experience.
Is Linux actually safer than Windows for a server?
Linux’s smaller attack surface on a minimal server install, combined with granular permission controls and mature tools like SELinux and AppArmor, gives it a real security advantage for server workloads specifically. That advantage disappears fast on an unpatched, poorly configured Linux box, security comes from hardening and maintenance, not the kernel name alone.
How can I secure my VPS as fast as possible?
Follow the 10-minute checklist: update packages, create a sudo user with SSH key access, disable root login and password authentication, enable a default-deny firewall, install fail2ban, and turn on unattended security updates. That sequence, backed by documented hardening priorities, blocks the overwhelming majority of automated attack attempts.
Is a VPS safer than a VPN?
They solve different problems and aren’t direct substitutes. A VPS is a server you run applications on; a VPN encrypts and routes your network traffic. In practice, the two work together, using a VPN like WireGuard to restrict administrative access to your VPS is one of the stronger network-hardening moves covered in this guide.


